By: T16-2 Since: Sept 2018 Licence: MIT
- 1. Introduction
- 2. Quick Start
- 3. Features
- 3.1. Viewing help :
help - 3.2. Login the app:
login - 3.3. Logout the app:
logout - 3.4. Adding an employee :
add - 3.5. Editing an employee :
edit - 3.6. Deleting an employee :
delete - 3.7. Listing all personnel of the company :
list - 3.8. Adding an event:
addEvent - 3.9. Editing an event:
editEvent - 3.10. Deleting an event :
deleteEvent - 3.11. Sorting all events:
sort - 3.12. Showing events associated with user:
showmine - 3.13. Searching for the events using keywords:
findEvent - 3.14. Inviting employee to event:
invite - 3.15. Removing employee from event:
remove - 3.16. Selecting a person:
select - 3.17. Selecting an event :
selectEvent - 3.18. Locating persons by name:
find - 3.19. Listing entered commands :
history - 3.20. Undoing previous command :
undo - 3.21. Redoing the previously undone command :
redo - 3.22. Clearing all entries :
clear - 3.23. Exiting the program :
exit - 3.24. Saving the data
- 3.1. Viewing help :
- 4. FAQ
- 5. Command Summary
1. Introduction
ProManage is a professional desktop application for companies that specialises in executing projects that undergoes a long and tedious planning phase. This is particularly useful for companies that have a distinct structure and chain of command. For each project, there is a project team, which is usually led by a Manager. The company would usually consist of a flexible number of departments such as Admin, Logistics, Programmes, Finance, Publicity, Marketing and Safety. ProManage targets these respective project teams, and allow Manager and Employees to manage their teams and events.
Our application aims to ease the mode of task, event allocation and management by providing an all-in-one platform for the project team. It saves companies' time and money. Our customers will feel at ease communicating with one another in their project team setting. There is no better way to work than a CLI application that facilitates workflow than ProManage! More importantly, ProManage is optimized for those who prefer to work with a Command Line Interface (CLI) while still having the benefits of a Graphical User Interface (GUI). ProManage can help you manage project scheduling effectively. Interested? Jump to the Section 2, “Quick Start” to get started. Enjoy!
2. Quick Start
-
Ensure you have Java version
9or later installed in your Computer. -
Download the latest
proManage.jarhere. -
Copy the file to the folder you want to use as the home folder for your ProManage App.
-
Double-click the file to start the app. The GUI should appear in a few seconds.
-
Type the command in the command box and press Enter to execute it.
e.g. typinghelpand pressing Enter will open the help window. -
Some example commands you can try:
-
addn/John Doe p/98765432 e/johnd@example.com a/John street, block 123, #01-01 dep/ADMIN des/Manager: adds an employee namedJohn Doeto the Manager List. -
addEventn/Annual General Meeting d/Weekly Meeting l/Conference Room 1 date/2018-09-28 s/12:00 e/23:59 ` : creates a new event `Annual General Meeting -
delete3: deletes the 3rd person shown in the contact list list -
delete3: deletes the 3rd person shown in the contact list list -
exit: exits the application
-
-
Refer to Section 3, “Features” for details of each command.
3. Features
Command Format
-
Words in
UPPER_CASEare the parameters to be supplied by the user e.g. inadd n/NAME,NAMEis a parameter which can be used asadd n/Some Meeting. -
Items in square brackets are optional e.g
DEPT, [MORE_DEPTS,]can be used asDept1, Dept2or asDept1. -
Items with
… after them can be used multiple times including zero times e.g.[MORE_DEPTS,]…can be used asDept1,Dept1, Dept2etc. -
Parameters can be in any order e.g. if the command specifies
n/NAME t/TIME,t/TIME n/NAMEis also acceptable.
|
Three types priorities: All clicking features are disabled. Clicking on persons and events will not trigger anything. |
3.1. Viewing help : help
Format: help
3.2. Login the app: login
Priority level: default
Login to the app as one of the following identity: manager or employee or as EMAIL.
The user can only login into ProManage if his/her email has been registered in the ProManage system before.
Once login, you will not be able to login again unless the user chooses to logout.
Format: login identity
Example:
login manager
login as johnd@example.com
3.3. Logout the app: logout
Priority level: manager, employee
Logout the app once you have login.
After successfully logging out, you will be able to login again.
Format: logout
Example:
logout
3.4. Adding an employee : add
Priority level: default,manager
Adds an employee to ProManage
Format: add n/NAME p/PHONE_NUMBER e/EMAIL a/ADDRESS dep/DEPARTMENT des/DESIGNATION [t/TAG]…
|
| An employee can have any number of tags (including 0) |
Example:
-
add n/John Doe p/98765432 e/johnd@example.com a/John street, block 123, #01-01 dep/ADMIN des/Manager
3.5. Editing an employee : edit
Priority level: default,manager
Edits the details of the employee:
Format:
edit PERSON_INDEX [n/NAME] [p/PHONE_NUMBER] [a/ADDRESS] [dep/DEPARTMENT] [des/DESIGNATION] [t/TAG]…
Examples:
-
edit 1 p/91234567 a/The Vision
Edits the phone number and address of the 1st person to be91234567andThe Visionrespectively.
3.6. Deleting an employee : delete
Priority level: default,manager
Delete an employee from ProManage:
Format: delete PERSON_INDEX
Examples:
-
list all people
delete 2
Deletes the 2nd person in the employee list.
3.7. Listing all personnel of the company : list
Shows a list of all the personnel, all the events, or those people in the specific department in the project team
Format/Prompts:
Enter command to list all people: list all people
Enter a command to list all the events: list all events
Enter a command to list all people and events: list all
Enter a command to list people in the specific DEPARTMENT: list dep DEPARTMENT
Example:
list dep Admin
list dep Admin Finance
3.8. Adding an event: addEvent
Priority level: default,manager
Adds an event to ProManage
Format: addEvent n/NAME d/DESCRIPTION l/LOCATION date/DATE s/START_TIME e/END_TIME
|
Example:
-
addEvent n/Board Meeting d/Weekly Meeting l/Conference Room 1 date/2018-09-28 s/14:00 e/15:45
Creates an event named Board Meeting with description "Weekly Meeting" at Conference Room 1 at 2018-09-28, from 14:00 to 15:45.
3.9. Editing an event: editEvent
Priority level: default,manager
Edits the details of the events:
Format: editEvent EVENT_INDEX [n/NAME] [d/DESCRIPTION] [l/LOCATION] [date/DATE] [s/START_TIME] [e/END_TIME]
Examples:
-
editEvent 10 n/Weekly Meeting d/Check on progress l/Conference Room 2 date/2018-09-10 s/12:00 e/14:00
3.10. Deleting an event : deleteEvent
Priority level: default,manager
Delete the specified event from ProManage.
Format:
deleteEvent EVENT_INDEX
Examples:
-
deleteEvent 2
Deletes the 2nd event in the address book.
3.11. Sorting all events: sort
Priority level: all
Sort the event listing based on the key words provided.
Able to sort with event’s name, event’s date, event’s starttime, event’s endtime.
If both event’s have the same date then starttime will be compared.
Key word:
1) event’s name: name
2) event’s date: date
3) event’s starttime: starttime
4) event’s endtime: endtime
Format: sort key word
Example:
-
sort name
Sort the event list alphabetically
3.12. Showing events associated with user: showmine
Priority level: manager, employee
This function is only applicable to users who have login with their email.
Filter and list out events which they are listed as attendees.
Format: showmine
3.13. Searching for the events using keywords: findEvent
Priority level: all
Finds events whose names contain any of the given keywords or whose description contains any of the given keywords (case-insensitive).
Format: findEvent KEYWORD [MORE_KEYWORDS]
Example:
-
findEvent Meeting Weekly
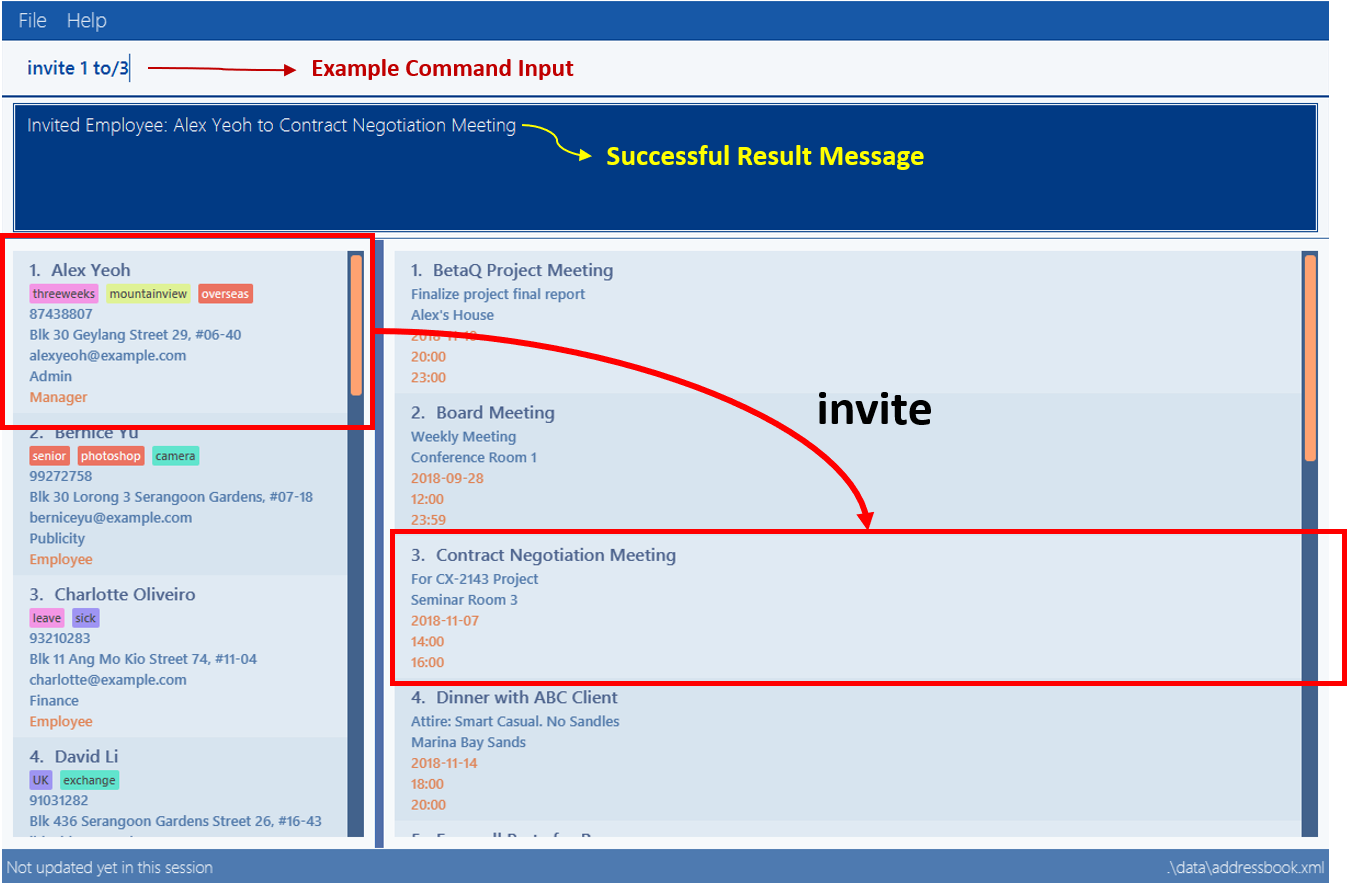
3.14. Inviting employee to event: invite
Priority level: all
Invites an employee to an event.
Format: invite PERSON_INDEX to/EVENT_INDEX
Example:
-
invite 1 to/3
Invite 1st employee on employee list to 3rd event on event list
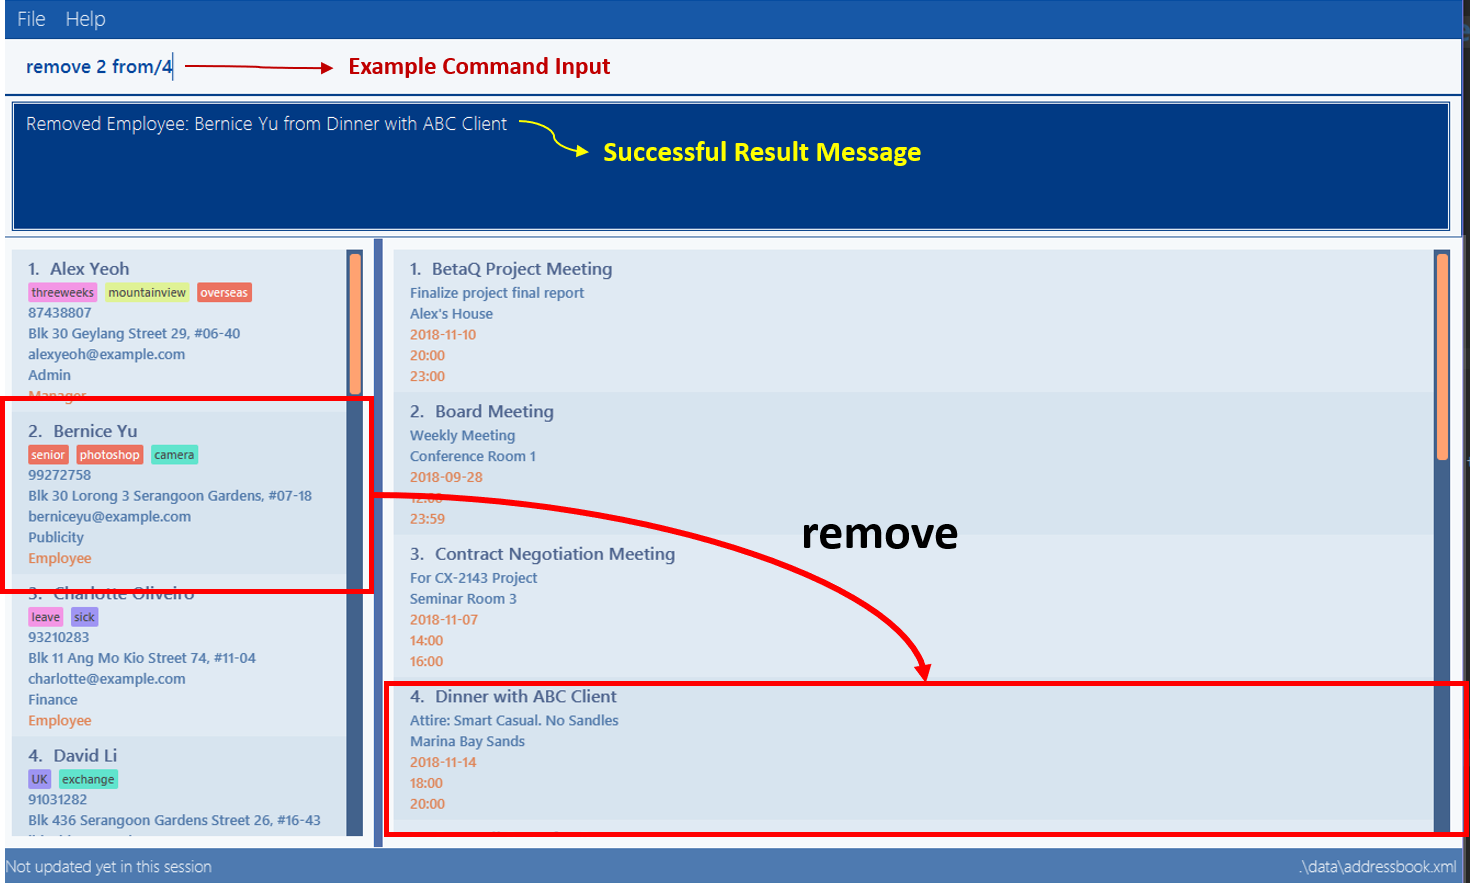
3.15. Removing employee from event: remove
Priority level: default,manager
Removes an employee from the an event.
Format/Prompts: remove PERSON_INDEX from/EVENT_INDEX
Example:
-
remove 2 from/4
Remove 2nd employee at employee list from 4th event at event list
3.16. Selecting a person: select
Priority level: all
Selects an employee and view the selected employee’s events at the indicated time on the event list panel.
Format/Prompts:
Enter a command: select PERSON_INDEX [date/DATE] [m/MONTH] [y/YEAR]
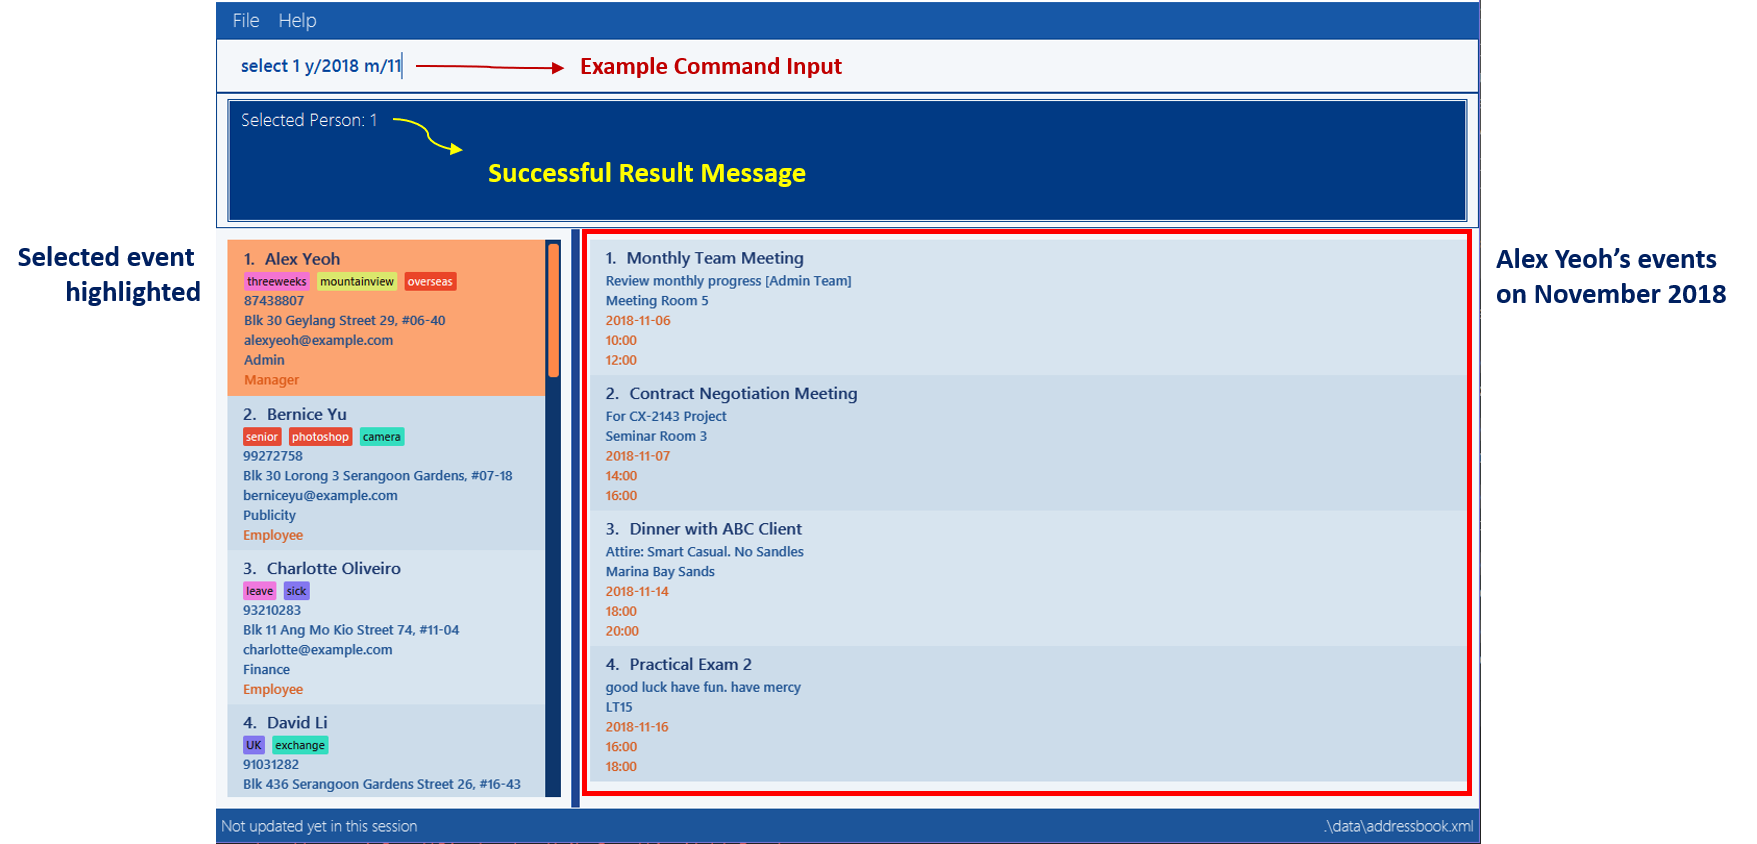
Examples:
-
select 1: view all events of employee at index 1 -
select 1 date/2018-10-31: view all events of employee at index 1 at 2018-10-31 -
select 1 m/08: view all events of employee at index 1 in August -
select 1 y/2018: view all events of employee at index 1 in 2018 -
select 1 y/2018 m/08: view all events of employee at index 1 in August 2018
3.17. Selecting an event : selectEvent
Priority level: all
Selects the specified event by index and displays all employees attending the event.
Format: selectEvent 1
|
If any of the attendees are edited or removed, the filtered employee list will not update. The |
Examples:
-
selectEvent 2
Selects the 2nd event in the address book and shows its attendees. -
invite 1 to/1(invites an attendee to an event)
selectEvent 1(select the event to show the attendee)
edit 1 n/New Name(edit the name of the attendee)
selectEvent 1(re-selects the event to show the updated name of the attendee)
3.18. Locating persons by name: find
Priority level: all
Finds employees whose names contain any of the given keywords or whose email matches any of the given keywords (case-insensitive).
Format: find KEYWORD [MORE_KEYWORDS]
3.19. Listing entered commands : history
Priority level: all
Lists all the commands that you have entered in reverse chronological order.
Format/Prompts:
Enter a command: history
|
Pressing the ↑ and ↓ arrows will display the previous and next input respectively in the command box. |
3.20. Undoing previous command : undo
Priority level: all
Restores the event schedule or address book to the state before the previous undoable command was executed. Only commands that modify the entries in the event schedule or address book are able to be undone. The unfiltered event schedule and address book will be displayed after undoing the previous command.
Format/Prompts:
Enter a command: undo
|
Undoable commands: those commands that modify the event schedule’s or address book’s content ( |
Examples:
-
delete 1
list all
undo(reverses thedelete 1command) -
select 1
list all
undo
Theundocommand fails as there are no undoable commands executed previously. -
delete 1
clear
undo(reverses theclearcommand)
undo(reverses thedelete 1command)
3.21. Redoing the previously undone command : redo
Priority level: all
Reverses the most recent undo command. Only commands that modify the entries in the event schedule or address book will be reversed. The unfiltered event schedule and address book will be displayed after redoing the command.
Format/Prompts:
Enter a command: redo
Examples:
-
delete 1
undo(reverses thedelete 1command)
redo(reapplies thedelete 1command) -
delete 1
redo
Theredocommand fails as there are noundocommands executed previously. -
delete 1
clear
undo(reverses theclearcommand)
undo(reverses thedelete 1command)
redo(reapplies thedelete 1command)
redo(reapplies theclearcommand)
3.22. Clearing all entries : clear
Priority level: all
Clears all entries from the event schedule.
Format/Prompts:
Enter a command: clear
3.23. Exiting the program : exit
Priority level: all
Exits the program.
Format/Prompts:
Enter a command: exit
3.24. Saving the data
ProManage data saves data in the hard disk automatically after any command that changes the data.
There is no need to save manually.
4. FAQ
Q: How do I transfer my data to another Computer?
A: Install the app in the other computer and overwrite the empty data file it creates with the file that contains the data of your previous Address Book folder.
5. Command Summary
-
Help:
help -
Login:
login IDENTITYwhere IDENTITY is either manager or employee orlogin as existingemail@example.com -
Logout:
logout -
Add Employee:
add n/NAME p/PHONE_NUMBER e/EMAIL a/ADDRESS dep/DEPARTMENT des/DESIGNATION [t/TAG]… -
Edit Employee :
edit PERSON_INDEX [p/PHONE_NUMBER] [a/ADDRESS] [dep/DEPARTMENT] [des/DESIGNATION] [t/TAG]… -
Delete Employee :
delete PERSON_INDEX -
Find Employee :
find KEYWORD [MORE_KEYWORDS] -
List :
list allORlist all peopleORlist all eventsorlist dep DEPARTMENT -
Sort :
sort KEYWORD -
Add Event :
addEvent n/NAME d/DESCRIPTION l/LOCATION date/DATE s/START_TIME e/END_TIME -
Edit Event :
editEvent EVENT_INDEX [n/NAME] [d/DESCRIPTION] [l/LOCATION] [date/DATE] [s/START_TIME] [e/END_TIME] -
Delete Event :
deleteEvent EVENT_INDEX -
Find Event :
findEvent KEYWORD [MORE KEYWORDS] -
Invite :
invite PERSON_INDEX to/EVENT_INDEX -
Remove :
remove PERSON_INDEX from/EVENT_INDEX -
Select Employee :
select PERSON_INDEX [date/DATE] [m/MONTH] [y/YEAR] -
Select Event :
selectEvent EVENT_INDEX -
Show Mine:
showmine -
History :
history -
Undo :
undo -
Redo :
redo -
Clear :
clear -
Exit :
exit